AI-translated. Read the original in KoreanEmbedded slides, videos and images remain in their original language.
Android MVP Pattern: What, Why, and How?
1. Before We Begin
I'm still a junior developer at Buzzvil, and the experiences I've had here have changed me a great deal. Learning alongside talented developers has helped me identify several areas I need to study if I want to become a strong developer myself. One is knowing how to apply software design patterns in the right places.
Fortunately, many patterns have emerged and been validated through other people's experience. I felt that if I kept exploring them and developed a sense of when to use each one, learning them wouldn't be too difficult. Until then, I'd focused primarily on getting systems to work. But I also had a somewhat vague sense that, to build better products over the long term, I needed to learn how to structure code for readability, extensibility, and collaboration. That thought fueled my curiosity.
Then I had an opportunity to refactor production code using several major patterns. Applying them firsthand showed me that the difference between having a pattern and not having one was larger than I'd expected. That's the background to this, my first post on Buzzvil's tech blog. Drawing on my experience refactoring HoneyScreen's Android code, I'll explain how to apply the MVP pattern to an Android application.
2. About the MVP Pattern
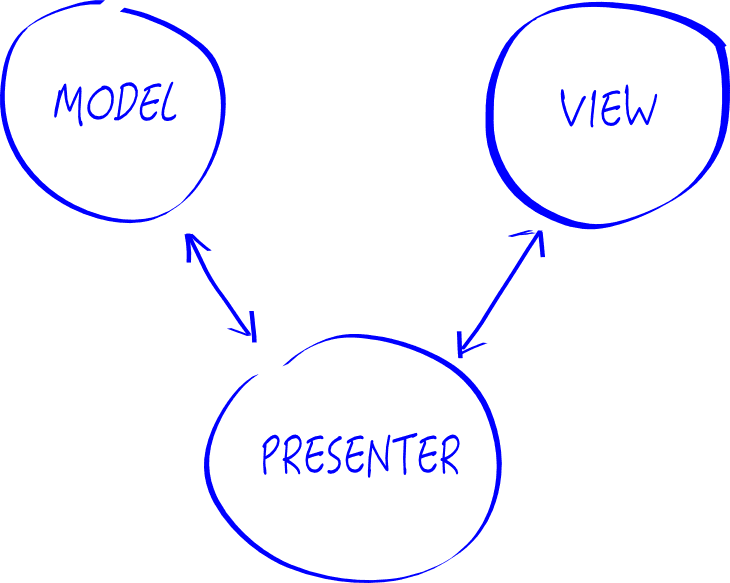
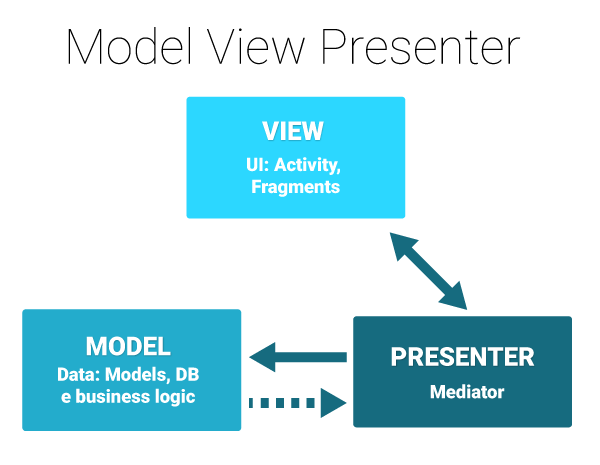
MVP stands for Model, View, and Presenter. Its central idea is to separate the user interface (View) from the business logic (Model), delegating their interactions to another object (Presenter) so that they affect each other as little as possible. Here's what each part does:
- Model: Stores and processes the data used internally—the part commonly called “business logic.” It is independent of the other components, including the View and Presenter.
- View: The user interface, or UI. In Android, Activities and Fragments are typical examples. The View receives processed data from the Model through the Presenter and displays it to the user. It also detects user actions and Activity lifecycle changes and passes them to the Presenter. Because it exchanges data through the Presenter, it depends on the Presenter.
- Presenter: The intermediary between the Model and View. It receives user actions detected by the View and invokes Model logic, or receives results from the Model and passes them to the View to update the UI. It depends on both the Model and View.
Reducing coupling between the Model and View with MVP improves extensibility: when you add or change functionality, you only need to modify the relevant parts. It also makes tests easier to write, helping you work on the code more safely.
3. Why MVP Fits Android
Android UI components are responsible both for drawing the screen and for handling actions on its UI elements. This framework characteristic makes it difficult to apply the MVC (Model, View, Controller) pattern commonly used in web applications: the View that draws the screen and the Controller that handles actions cannot be cleanly separated.
This is why people have argued that MVP is a better fit for Android. Google, which develops Android, also officially maintains sample projects using MVP under the name Android architecture blueprints. That suggests the pattern has gained some validation as a suitable approach for Android.
4. Before Applying MVP
The part of HoneyScreen I refactored with MVP was the final step of user registration: entering profile information such as nickname, age, gender, and referrer, then sending a registration request to the server. There isn't enough room to cover the actual production code, so I'll use a simplified version and focus on the process of applying MVP. Here is a condensed version of the original Profile Activity:
public class ProfileActivity extends Activity {

    EditText etNickname;
    Button btSignUp;

    String email;

    @Override
    public void onCreate(Bundle savedInstanceState) {
	super.onCreate(savedInstanceState);
	setContentView(R.layout.activity_profile);
	email = getIntent().getStringExtra("email");
	initView();
    }

    private void initView() {
	etNickname = (EditText) findViewById(R.id.nickname);
	etNickname.setText(makeNickname());
	btSignUp = (Button) findViewById(R.id.button_signup);

	btSignUp.setOnClickListener(new View.OnClickListener() {
            @Override
            public void onClick(View v) {
            	if (checkNicknameLength()) {
            	    callSignUp();
            	} else {
            	    Toast.makeText(ProfileActivity.this, "Nickname is too short", Toast.LENGTH_SHORT).show();
            	}
            }
        });
    }

    private String makeNickname() {
	int pos = email.indexOf("@");
	return email.substring(0, pos);
    }

    private boolean checkNicknameLength() {
        if (etNickname.getText().toString().length() < 4) {
	    return false;
	} else {
	    return true;
	}
    }

    private void callSignUp() {
	Map<String, String> params = new HashMap<>();
	params.put("nickname", etNickname.getText().toString());
	params.put("email", email);
	// Add additional parameters
	RequestInterface.requestPOST("/SIGNUP/", params, new ResponseListener() {
            @Override
            public void onSuccess(JSONObject json) {
            	Intent intent = new Intent(ProfileActivity.this, MainActivity.class);
            	Bundle params = new Bundle();
                params.putString("user_info", json.getString("user_info"));
        	intent.putExtras(params);
        	startActivity(intent);
            }

            @Override
            public void onError(int code, String message) {
            	Toast.makeText(ProfileActivity.this, message, Toast.LENGTH_SHORT).show();
            }
        });
    }
}
As you can see, a single Profile Activity class handles everything. This simplified example is relatively easy to follow. But add more view elements, database access, or complex background logic such as AsyncTask, and it becomes much harder to understand. With all the logic mixed together, adding or changing features becomes difficult, and the dependency on the Android framework makes unit tests harder to write.
5. Analyzing the Requirements
We can summarize the requirements for the profile-entry step implemented above as follows.[info_box title="Requirements - 1st"]
- Receive and store the email address the user entered in the previous Activity.
- Display a suggested nickname in the nickname field, using the part of the email address before the @ symbol.
- When the user taps the sign-up button, check whether the nickname meets the minimum length. Show an error if it doesn't; otherwise, continue.
- Call the sign-up API with the email address and nickname as parameters.
- If the sign-up API returns a failure, show the user the error message received from the server. If it succeeds, complete registration and navigate to HoneyScreen's MainActivity, passing along the completed user information returned in the response.
[/info_box]Let's break these requirements down further and separate them into Data and UI responsibilities.[info_box title="Requirements - 2nd"]
- Data: Receive and store the email address. UI: When the Activity is created, parse the Intent received from the previous Activity and pass along its contents.
- Data: Generate a suggested nickname from the email address. UI: Display that suggestion in the nickname field.
- Data: Check the nickname's length. UI: Detect a tap on the sign-up button and pass along the nickname; display an error message.
- Data: Call the sign-up API. UI: None.
- Data: Receive the sign-up API response. UI: Display an error message or navigate from ProfileActivity to MainActivity.
[/info_box]
6. Defining the Structure
The Model implements the Data requirements, so we can use that list to define its method signatures. Many names overlap with the earlier code, but there are two important changes. First, we've removed access to View elements such as Intent and EditText; methods now receive just the data they need as parameters. Second, because the API responds asynchronously, we pass in a listener so the Model can deliver the response to its caller—the Presenter.
void setUserData(String email);
String makeNickname();
boolean checkNicknameLength(String nickname);
void callSignup(ApiListener listener);

public interface ApiListener {
    void onSuccess(JSONObject json);
    void onFail(String message);
}
We can split UI requirements into active operations that change the UI and passive operations that recognize events. For the former, the Presenter calls the View; for the latter, the View calls the Presenter.
That means “display the suggested nickname,” “display an error message,” and “navigate to another screen” belong in the View. Handling the data parsed from the Intent when the Activity is created and responding to the button-click event belong on the Presenter side of the contract.
Based on that distinction, we'll define the contract between the mutually dependent View and Presenter in a Java interface called Profile. The final View and Presenter classes will implement Profile.View and Profile.Presenter, respectively.
public interface Profile {

    interface View {
	void showNickname(String nickname);
	void showErrorMessage(String message);
	void startMainActivity(JSONObject json);
    }

    interface Presenter {
        void initUserData(String email);
        void callSignup(String nickname);
    }

}
7. Implementation
Now we'll implement the classes using the method signatures and interfaces defined above. Since the Model has no dependencies on the Presenter or View, we can implement its methods directly:
public class ProfileModel {

    String email;

    public void setUserData(String email) {
	this.email = email;
    }

    public String makeNickname() {
	int pos = email.indexOf("@");
	return email.substring(0, pos);
    }

    public boolean checkNicknameLength(String nickname) {
	if (nickname.length() < 4) {
	    return false;
	} else {
	    return true;
	}
    }

    public void callSignup(ApiListener listener) {
	Map<String, String> params = new HashMap<>();
	params.put("nickname", etNickname.getText().toString());
	params.put("email", email);
	// Add additional parameters
	RequestInterface.requestPOST("/SIGNUP/", params, new ResponseListener() {
            @Override
	    public void onSuccess(JSONObject json) {
	        listener.onSuccess(json);
	    }

	    @Override
	    public void onError(int code, String message) {
	        listener.onFail(message);
	    }
	});
    }

    public interface ApiListener {
	void onSuccess(JSONObject json);
	void onFail(String message);
    }
}
The View and Presenter require a little more work. Since the View depends on the Presenter, it holds a Presenter object as a member variable and delegates the appropriate work when an event occurs. The Presenter depends on both the View and Model, so it holds both as member variables. It calls their methods according to the requirements, coordinating interactions between the UI and data layers.
Here is ProfileActivity implementing Profile.View. It notifies the Presenter of events by calling initUserData() during onCreate() and callSignup() from the button's OnClickListener:
public class ProfileActivity extends Activity implements Profile.View {

    EditText etNickname;
    Button btSignUp;

    Profile.Presenter presenter;

    @Override
    public void onCreate(Bundle savedInstanceState) {
	super.onCreate(savedInstanceState);
	setContentView(R.layout.activity_profile);
	presenter = new ProfilePresenter(this);
	presenter.initUserData(getIntent().getStringExtra("email"));
	initView();
    }

    private void initView() {
	etNickname = (EditText) findViewById(R.id.nickname);
	btSignUp = (Button) findViewById(R.id.button_signup);

	btSignUp.setOnClickListener(new View.OnClickListener() {
            @Override
            public void onClick(View v) {
            	presenter.callSignup(etNickname.getText().toString());
            }
        });
    }

    @Override
    public void showNickname(String nickname) {
    	etNickname.setText(nickname);
    }

    @Override
    public void showErrorMessage(String message) {
    	Toast.makeText(ProfileActivity.this, message, Toast.LENGTH_SHORT).show();
    }

    @Override
    public void startMainActivity(JSONObject json) {
    	Intent intent = new Intent(ProfileActivity.this, MainActivity.class);
    	Bundle params = new Bundle();
        params.putString("user_info", json.getString("user_info"));
        intent.putExtras(params);
        startActivity(intent);
    }
}
Finally, we implement Profile.Presenter to complete the ProfilePresenter class. There are several ways to invoke its constructor. Here, we'll create the Presenter when the View—which has its own lifecycle—is created in onCreate(), passing the View into the constructor. The Presenter constructor then creates the ProfileModel. The remaining methods process data through the Model and send it to the View as specified in the requirements.
public class ProfilePresenter implements Profile.Presenter {

    Profile.View profileView;
    ProfileModel profileModel;

    public ProfilePresenter(Profile.View profileView) {
        this.profileView = profileView;
        this.profileModel = new ProfileModel();
    }

    @Override
    public void initUserData(String email) {
    	profileModel.setUserData(email);
    	profileView.showNickname(profileModel.makeNickname());
    }

    @Override
    public void callSignup(String nickname) {
    	if (profileModel.checkNicknameLength(nickname)) {
    	    profileModel.callSignup(new ProfileModel.ApiListener() {
		@Override
		public void onSuccess(JSONObject json) {
		    profileView.startMainActivity(json);
		}

	    	@Override
	    	public void onFail(String message) {
		    profileView.showErrorMessage(message);
	    	}
    	    });
    	} else {
    	    profileView.showErrorMessage("Nickname is too short");
    	}
    }
}
8. Closing Thoughts
That completes the process of refactoring the profile-entry step with MVP. After applying it to the real code, the biggest benefit I noticed was that adding functionality now involved clearly separated UI and data work. What needed to be done was much clearer, making changes easier and faster.
MVP has been gaining ground in Android, which previously lacked a standardized development pattern, and examples of its application are increasingly easy to find. In this post, however, I wanted to address the uncertainty I felt while learning from those examples. Rather than only show the finished code, I tried to make the approach easier to understand by explaining the process in detail: analyzing requirements, defining interfaces, and implementing the classes.
It may be a small achievement, but I'm glad I was able to study one of the areas I'd wanted to learn—applying design patterns—from start to finish, put it into practice, and make HoneyScreen development a little more efficient.